
Warranty
All plant material is guaranteed to be healthy and free of infections, disease, and or insects at the time of installation.
One time, One year warranty applies to the following:
- Shrubs – Replacement of same/similar shrubbery as per the original contract
- Trees – Replacement of same/similar tree as per the original contract
Special warranty conditions for the following:
- Perennials – Are warranted 60 days after install date
- Annuals – Are warranted up to 7 days from install date
- Sod – Is warranted for 24hrs from install dated
Warranty conditions:
- Owner/Agent is responsible for the proper watering practices to maintain proper moisture levels in the root zones of all newly installed material (reference watering guide below).
- Warranty claims need to be done in writing prior to expiration of the warranty periods as noted above.
- Any warranty replacements will be done during the ideal time of year, regardless of date of installation.
- Any warranty claims will be denied if the clients account is not current. If at any time any amount owed is being held for replacements will immediately void any warranty expressed or implied from that day forward after the replacements are installed.
- Owner/Agent will be responsible for any additional special care needed to keep the material alive during the warranty period. This may but not limited to, fungicide applications, algaecide applications, miticide applications and or insecticide applications.
- If at any time after a claim has been made, we determine that the material was not cared for in a proper manner, we reserve the right to refuse to warrant the plant material in question.
- Warranty covers plant mortality.
For current Maintenance clientele. Residential or commercial, the (1) time, (1) year replacement warranty will convert to a lifetime warranty as long as we are servicing your property. Any replacements will be made at the size of the original plantings.
Care Guide
A Simple Instruction Guide for How to Clean Pavers
Are your patio pavers looking dingy and old? Are you thinking about replacing them?
You should first know patio pavers are a big a best investment. The average paver patio costs around $18-25 a square foot to replace, which can run you anywhere from $2,000 to $4,000 to replace depending on size.
But there’s actually another solution instead of shelling out thousands of dollars. You can clean them!
Here’s a handy instruction guide for how to clean patio pavers by pressure washing.
How to Clean Pavers Overview
Patios make a huge difference in your home’s curb appeal. You want them to stay nice so they don’t have a negative impact on your home’s look. Even though pavers are very durable and reliable, they can still begin to get a little scruffy after all the fun barbecues and weather conditions.
Miss the days when your patio used to sparkle? No need to worry — cleaning pavers is pretty simple!
If you maintain your pavers, cleaning is less time-consuming. Regular maintenance and cleaning are also important to save you money because you won’t have to restore or replace them.
You should power wash your patio annually. You may need to purchase a basic cleaning solution for your pavers.
Be sure you test this solution on a small area before you clean the whole patio. This way you know that the solution won’t discolor your entire patio!
Cleaning your pavers properly has more benefits than just making them look nice. Regular cleanings make your pavers more durable and safer.
Pressure Washing
Using a pressure washer to clean your pavers helps remove any tough stains and breakdown all buildups. Grass, leaves, dust, debris, and spills leave marks on your patio.
You can rent or buy a power washer, or you can try a high-pressure setting on your hose nozzle. You may need to hit a couple areas twice to make sure they’re completely clean.
The key to not damaging your patio is in not using too much pressure where you don’t need to. You may need to use a higher setting to remove a stain, but you should probably take the pressure setting down on other areas of your patio.
Make sure you keep the stream on the pavers and not hit the joints directly. This could cause your pavers to get dislodged. It’s normal for some of the sand in the joints to get displaced, so just brush it back after you are done pressure washing.
After pressure washing, you should add a new layer of polymeric sand. You need to activate the polymers for it to harden. You can do this by applying a light mist to the sand.
Other Ways to Clean Patio Pavers
As mentioned, you should clean your patio pavers annually with a pressure washer. If you’re looking to clean other times, here are some other methods:
1. Soap and Water
You can use everyday dish soap to clean your pavers. Add some soap in a bowl and add water. Then start lightly scrubbing the dirty spots.
2. Simple Green
Simple Green is a great cleaning soap for patio paver stones. It does not have any harsh chemicals to discolor or ruin your stones.
3. White Vinegar and Water
Another natural way to touch-up your paver stones is to use a mixture of water and white vinegar. You have to use white vinegar because dark vinegar could stain. Let the vinegar mixture sit on the pavers for about an hour before using soap and water to scrub any stains.
4. Use a Broom
It’s important to remove dirt regularly from your patio stones. Grab a broom and sweep at least once a week.
If you think it’s going to rain, grab the broom and do a quick sweep because leaves can stain your paver stones when they get wet.
Removing Weeds
You don’t want weeds to ruin your newly-cleaned pavers. Weeds grow between the seams and are more than eyesores; they can also weaken these seams.
Use an anti-weed agent to solve this problem. Powdered herbicides are easy to sprinkle along the seams to combat those nuisance weeds. Be sure you remove any weeds you see by hand.
Sealing Pavers
You spend time cleaning your pavers, so it’s important to protect your investment even more by sealing it. Sealants protect against Mother Nature and can help prevent chipping. You should re-seal your patio pavers at least every couple of years.
The sealers will also help guard against stains because they add a protective thin coat. Apply sealers with a paintbrush after your patio is fully cleaned. Any debris on your patio prevents the sealer from bonding and protecting your pavers.
Repair Grout Lines
Keeping a clean patio helps your pavers last longer but sometimes you need to re-grout, especially if you use your patio often. Re-grouting seams is pretty simple. Use a putty knife to apply a small amount of grout where you need it.
Make sure you remove any excess grout from the pavers because it could stain. Use a wire brush to remove the dried grout traces. You can also use a grout-specific sealer to protect the seams if your patio has a lot of foot traffic.
Replace Pavers
No matter how often you clean, you may need to replace a few pavers. It’s relatively easy to replace a stone or paver without damaging the surrounding areas. Getting rid of that damaged stone will enhance your patio instantly.
Looking for a Pressure Washing Company?
If you pressure wash your pavers correctly, it will help your property look good as new. Don’t fret if you don’t want to handle pressure washing. It can be intimidating because you don’t want to ruin your patio and displace the pavers.
Now you know how to clean patio pavers, but maybe you want some help from an expert because you don’t have time or patience to get it done.
You can always contact us at Better View for a quote to clean any part of your home’s exterior. Better View and The Grounds Guys cleans it all from pavers, windows, gutters, siding, and more.
Deck Maintenance Schedule & Tips
Annual deck cleaning and maintenance will forestall repairs and protect your investment.
Because decks are exposed to the elements all year round, it’s a good idea to establish a routine of upkeep that’ll protect your deck and prevent expensive repairs.
Here’s a simple deck maintenance schedule to keep it safe, sound, and looking great.
Spring: Wash the Deck
An unwashed deck is an invitation to mold and mildew, which can cause rot. Here’s how to wash your deck:
1. Remove debris from between deck boards using a putty knife. Pay special attention to the areas where deck boards cross the joists — the structural members underneath the decking.
TIP: For a makeshift extension that’s a real knee-saver, try pushing the handle of your putty knife into a length of 1¼-inch PVC pipe. Some putty knives squeeze right in. Or buy a pole-type groove and crevice cleaner.
2. Protect all shrubs and plantings. Wet them and cover them with plastic sheeting.
3. Thoroughly sweep the deck.
4. Choose an appropriate cleanser.
- Wood deck: Use a standard deck cleaner and follow its directions. Some require the decking to be wet first. Some don’t.
- Composite deck: Use a cleaner specifically formulated for composite material. Attack grease and oil stains with a commercial degreaser and detergents.
- Vinyl (cellular PVC) deck: You’ll only need to use warm water and a mild soap to remove mold, mildew, and dirt.
5. Clean the deck. Choose a cloudy day when the decking is cool and the sun won’t evaporate the cleaner.
- Wood deck: Use a paint roller, a garden sprayer, or a stiff-bristled brush broom to apply the cleaner. Don’t let it pool. Don’t let the deck dry until you’ve scrubbed it clean. Then let it soak according to manufacturer’s instructions (usually about 10 minutes). Rinse thoroughly with clean water.
TIP: To clean wood railings: Working from the bottom up, apply the cleaner, scrub, and then rinse. Working from the top down splatters the cleaning solution onto dry wood where it can double-bleach the surface, leaving marks that don’t go away when the lower area is washed. Working from the bottom up means you’ll be splattering onto a wet surface where the cleaner is diluted, leaving no marks. - Composite deck: Scrub with a soft brush. Do not use a pressure washer — it can permanently damage the decking and will void any warranty. Remove rust and leaf stains with a deck brightener containing oxalic acid.
- Vinyl deck: Scrub in a circular motion using a stiff broom, then rinse thoroughly.
6. Let deck dry. Wait two days before sealing.
Spring: Seal the Deck
Sealers and stains are available at home improvement centers by the gallon — enough to cover 250 square feet of decking. Your finish options include:
- Clear sealer that lets the wood’s natural grain and color show through
- Toner that adds a bit of color but fully reveals the grain and provides some protection against sunlight (ultraviolet or UV light)
- Semi-transparent stain that tints the wood, but lets some grain show
- Solid stain and opaque color that seal weathering damage and completely cover the grain
Expect to reapply clear sealers and toners annually. Reapply stain finishes as needed (every other year is a good routine) using the same or a slightly darker color. Be sure to wear gloves, a safety mask, and eye protection when applying stain and sealers.
1. Choose a two-day period when you’ll have clear skies and moderate temperatures.
2. Lightly sand the deck. Use a pole sander equipped with 80-grit paper to remove any furriness caused by washing.
3. Replace any missing or popped nails and screws. Replace protruding nails with deck screws slightly longer than the nail. If a nail only slightly protrudes, you may do more harm than good trying to pull it out. Pound it home.
TIP: When pulling out the nail with a hammer or pry bar, use a scrap of wood as a fulcrum for greater leverage and to avoid damaging the deck.
4. Apply the sealer or stain. Use a roller to apply the sealer to the decking, covering three or four boards at a time. Use brushes and small rollers for railings, planters, and benches. Don’t let the sealant dry or puddle. Two thin coats is better than one thick one.
TIP: Deck sealants aren’t required or recommended for composite decks, although some composite decking can be stained to restore its color. Be sure the product is intended for composites. Don’t expect the same density of color that you would achieve with wood
Midsummer: Inspect and Repair Your Deck
When the weather is warm and dry, it’s a good time to give your deck’s structure a close inspection. Pay particular attention to any areas within 6 inches of the ground or close to sources of water, such as downspouts and planters.
1. Look for signs of rot. Probe structural members with a flat-blade screwdriver. Begin by checking stairs, especially where the stringers (the saw-tooth notched pieces that support the steps) meet the ground. Also check each perimeter post. If you can push the screwdriver a quarter-inch or more into a suspect area, you probably have rot.
TIP: Areas of rot that are no bigger than a silver dollar can be removed with a chisel, and the hole can be treated with wood preservative. Larger areas may require the structural member to be replaced. Consult our professional carpenter for an estimate for repairs.
2. Inspect the ledger. Using a flashlight underneath your deck, pay special attention to the ledger — that all-important piece of framing that attaches the deck to the house. A damaged ledger is the cause of 90% of all deck collapses.
TIP: The ledger should be attached with lag screws, not just nails. The flashing — the metal cap that covers the top of the ledger and prevents moisture from getting behind the siding — should be free of rust and holes.
3. Check remaining joists, posts, and beams. Check all the hardware underneath, especially joist hangers, and replace any that are seriously rusted. Probe for signs of rot on the posts and joists. If anything looks doubtful, call in a pro to provide an estimate for any needed repairs.
TIP: If a framing member can’t be easily removed and replaced, reinforce it. For example, if a joist shows areas of rot, you can add a splint of comparable pressure-treated lumber alongside it, attaching the splint with two or three 3-inch deck screws every 12 inches. Then chisel away the rotten area and paint the raw wood with preservative.
4. Check for cracks or rotten decking boards. Not all cracks are a structural threat, but they’ll get worse with time. If you find damage, replace the piece.
5. Check the railing. Give it a good shake to be sure posts are not loose or damaged — loose connections may be remedied by drilling pilot holes and adding galvanized lag screws. Look for cracks that, over time, may have developed around fasteners such as nails or screws. To remedy, remove the fastener and seal the crack with an exterior-grade adhesive. Then, drill a new pilot hole and add a new galvanized deck screw.
Fall: Preventive Measures
Fall is also a good time to wash and seal your deck if you didn’t get a chance to in the spring. The point is to do it when temperatures are mild.
Otherwise, to keep your deck in good shape:
- Trim nearby bushes and trees. They need to be at least 12 inches from the deck to slow mold, moss, and rot.
- Don’t let leaves and other debris pile up in corners.
- Move planters, chairs, and tables occasionally to avoid discoloring the decking. Keep nearby gutters and downspouts in good repair.
Polymeric Sand Maintenance
Polymeric jointing sand is a high-tech mix of graded, colored sand and a binder, specially formulated for the filling of joints between pavers, slabs or natural stones. Unlike conventional sand it stays in place and remains stable. It softens when wet and firms up when dry to better resist soil movements. Because the sand gets stiff you can expect fewer weeds and less insect damage.
Polymeric sand can be kept in its original packaging, in a dry place and away from UV rays. Bags may be stored outside if they are properly protected with an opaque and waterproof tarp.
Polymeric Sand Upkeep
1. Preparation
Weather Conditions: There should be no precipitation for the next 24 hours. Temperature should remain above 32°F during the 48-hour drying period.
Surface Conditions: Begin with a dry surface to prevent moisture from activating the polymer, which could make sand stick to and stain the surface.
Removal of Failing Joints: Use a screw driver to remove older sand that is no longer maintaining a neat joint.
2. Spreading Sand Over the Pavers
Surface must be dry. If covering a large area, spread sand uniformly over the surface. Using a push broom, sweep the product to fill the joints completely, down to their full depth. If you prefer, use a small plastic cup filled with sand to direct the product into the joints.
3. Wetting the Joints
Important! Before wetting the surface, remove all sand residue with a leaf blower. Keep the leaf blower at a good distance, so as to not empty the joints. Sand that sits on paver surface and gets wet can stick like glue. Ensure that the wetting of one section is finished before moving on to another section.
1. Set the spray nozzle to “shower.”
2. Wet the section for approximately 30 seconds without displacing the sand.
3. Wait a few seconds and wet the same section again for approximately 30 more seconds to wet the joints completely.
4. Using a small screwdriver, verify the progress of the wetness in the section. The objective is to get joints wet 1 ½” deep.
5. Immediately move on to an adjacent section. Avoid flooding the surface to prevent unwanted run-off.
Tip: On textured pavers, after wetting the joints, use a leaf blower to blow excess water off the surface. This will remove any remaining sand and polymer residue to prevent hazing.
Drying: Drying time will be shorter if it is warm and dry, and longer if the climate is cool and damp. Temperature should remain above 32°F during the entire drying process.
Restrictions Before Use
• Foot traffic is okay right away, but avoid high heels that can disturb joints
• Motor-vehicle area, wait 24 to 48 hours
A Flagstone Maintenance Guide to Keep Your Patio Looking Pristine
Flagstone is a gorgeous, natural stone that is ideal for your patio. It complements the landscape well, and it adds an elegant touch to your outdoor space. Plus, it’s relatively easy to maintain, and it will last for centuries if you take care of it. (You may not last for centuries, but you should get some peace of mind knowing that you don’t have to replace your patio in your lifetime unless you want a new look.)
Here’s what you need to do to maintain your flagstone so that your patio looks great year after year:
Keep Excess Water Off It
Flagstone isn’t going to crumble under exposure to water, but it can become discolored. Excess water on the surface can lead to the growth of mold or mineral buildup, and it can cause overall weathering of the stone. Your patio won’t look as beautiful as it once did if it is constantly exposed to water and is discolored.
You can keep your flagstone looking great by removing excess water, including excess condensation. Use a squeegee to get rid of the water, just like you were mopping it.
Sweep It Regularly
Dirt and debris can build up on the surface of your flagstone, leading to discoloration and staining. You can easily prevent that from happening by just sweeping off your flagstone patio regularly.
Use a broom or a dust mop to get rid of dirt and dust at least once a week. You should also sweep if there has been a lot of wind or other activity that could be causing more dirt to land on your flagstone than usual.
Clean with a Stone Cleaner
Not all cleaners are appropriate for natural stone. Some cleaners can actually damage the stone by etching it or discoloring it. Therefore, you need to be careful what cleaners you choose to treat stubborn marks on your patio.
Choose a cleaner that is designed for natural stone to clean your flagstone patio. Follow the instructions carefully and use it with a soft mop or sponge. You can also use it with a low-pressure garden sprayer. Follow up with a rinse and squeegee the remaining water.
Treat Stains with Outdoor Bleach
Outdoor bleach is designed specifically to use on outdoor walls, fences, and so on. It is not the same as the bleach you would use on your clothes or for cleaning your home. You can use this bleach to spot clean stains that appear on your flagstone patio.
Follow the manufacturer’s directions for the bleach carefully, and thoroughly rinse your patio once you are done. Don’t worry about the bleach harming your yard or plants; used responsibly it won’t. Regular cleaning should help you avoid stains, but a good cleaning should be done every year to three years, including spot cleaning the stains.
It doesn’t take much to keep your flagstone patio looking beautiful. But you do need to be consistent with your maintenance so that the stone does not become discolored or damaged. If the stone does suffer discoloration, we might be able to restore it with an intensive cleaning. If the stone is damaged, you can easily replace the individual pieces in your patio with new flagstone. Installation and replacement is relatively easy, which is one reason that flagstone is so popular.
Adding a flagstone patio to your home can increase its value significantly – as well as increase your enjoyment of your home. Flagstone is easy to install, easy to maintain, and easy to afford. Better View Landscape LLC has a wide selection of stone pavers, including flagstone and other popular stones. Our professionals are committed to providing the best product and the highest level of service, whether we are helping you pick out your stone or handling your stone paver installation. Call or visit us today in Davidsonville to find the perfect stone for your project.
Proper Turf and Plant Watering
The following watering recommendations are provided as a general guideline for establishing and maintaining landscape plantings.
Turf – Newly established lawn areas require daily watering of at least ¾” of water. The goal is to maintain soil moisture while turf roots are being established. This may require the lawn areas to be watered more than once a day. When temps are below day time highs of 45 degrees sod may only need to be watered every 2-3 days. Soils and turf should be monitored for soil moisture content. The sod and/or soil should always be damp until sod is no longer able to be lifted because of root growth. Once roots have taken hold sod should be watered at least once to twice a week especially during hot and dry periods.
Trees / Shrubs / Perennials – For a general rule of thumb, plants require water a minimum of three (3) times a week. During cool season periods, such as Fall, plantings may require less water, conversely, during hot periods, such as Summer, plantings may require more water. The bottom line is that plants require water all year long. Trees and Shrubs still need water even when they are dormant in the winter months. Exterior temperatures will determine how much or little water is necessary. Proper watering practices must take place from the initial installation. Damage to the plant may occur if proper watering practices are delayed until visible signs appear such as wilting and stress.
Watering should take place a t the base of the plant or soil line. Avoid watering where water comes in contact with the foliage whenever possible. This ensures that the wet foliage does not burn the plant in the hot summer months. Complete all plant watering between the hours of 4:00 and 9:00 am. If you find it necessary to water during the heat of the day, avoid watering the plant over the top and use “soaker” type hoses. Keep in mind that evaporation caused by wind and sun is maximized during the heat of the day. Just apply more water during these times to get the same results. Avoid watering in the evening after 5:00 pm, as fungus problems may result from this practice. You may water in the evening when absolutely necessary, but avoid repeated evening watering
Apply enough water to penetrate the plants’ root system 8-10” on average depending on the type and size of plant you are watering. It is recommended to water approximately 15-20 gallons of water per tree, 5 gallons of water per shrub and approximately 1 gallon of water per perennial or small plant. If you are not sure pull back some mulch and dig down 3-5” in the soil to see if the soil is moist.
Proper Watering Management For Annuals
Here are some guidelines and a few tips to remember when watering your summer / spring annuals. Irrigation is the most crucial ingredient of successful plant performance.
- Water your flowers once per day. If the flowers are in pots, they will require more water as they tend to dry out faster than flowers in planting beds.
- Apply enough water to penetrate the root zone. (See Note Below)
- Allow the soil to dry out between watering.
- Complete all plant watering between 4:00 am and 9:00 am. Avoid watering in the evening after 5:00 pm, as fungus problems may occur. You may water in the evening when absolutely necessary, but avoid repeated evening watering. If your flowers are stressing / wilting, then you should water as soon as possible. If this occurs during the heat of the day, then avoid watering the flower over the top. This will prevent the foliage from scorching. It is better to water at the soil level or the base of the plant.
NOTE:
- In order to clarify any confusion about checking the soil for watering, here is a simple test you can do:
- Scoop up a handful of soil in the flower bed and try to pack into a small snowball. If the soil crumbles apart and will not pack, then the soil in too dry and you need to water.
- If the soil is muddy, then there is too much water. Allow the bed to dry out before watering again.
- If the soil packs and retains its snowball form, then there is sufficient moisture in the soil.
Snow and Ice Removal Parameters
For Plants, Trees and Shrubs
Winter is not the time when most people focus on yard work; however, it is a time of year when a lot of damage can happen. We want people to know how to care for plants, trees and shrubs during the winter. Winter yard tips include the following:
- CONTINUE WATERING.
Just because it isn’t hot, doesn’t mean that plants don’t need water.
Continue watering until a hard freeze. A well-hydrated plant has a better chance of survival.
- DON’T SHAKE BRANCHES COVERED WITH SNOW AND ICE.
It is best to gently brush off snow. Shaking limbs may break them. Wait for ice and frozen snow to melt naturally. If a limb does break, have it removed as soon as weather permits. It will help the tree or shrub heal better in the spring.
- WATCH OUT FOR WINTER WARM SPELLS.
It is normally not a problem if you get a few warm days in the middle of winter; however, if you covered plants with cones or cold frames, you may want to ventilate them during the day and cover them again at night.
- PRUNE.
Late winter is a good time to prune and shape ornamental trees and roses.
Another thing to think about in the winter is the use of salt or melting agents for snow and ice. It can damage plants and trees by drawing water away from their roots. Evergreen trees are particularly sensitive to salt. Look for brown needles or leaves on trees and shrubs; they are signs of damage. Building barriers to protect the plants from runoff and adding more sand and gravel to the salt mix will help minimize damage. There are also products that can be used preventively before the snow season to help reduce the risk of salt damage to your lawn or plant beds.
Pond Maintenance
SPRING MAINTENANCE:
* GG’s shall remove all debris from the surface of the water and the Surround the Pond Edges
* GG’s will reconnect and restart all submersible pumps and biofilters if they were previously removed for the winter.
* GG’s will divide, reposition, and discard the aquatic plants in the pond as necessary, keeping all vegetation limited to the perimeter of the pond. (if approved)
* If the pond is inhabited by fish, the owner/agent shall begin feeding the fish when the water temperature is 55 degrees or more, with an Autumn/ Spring food formulation. Do not feed fish more than they can eat in 3-5 minutes
SUMMER MAINTENANCE:
* GG’s will fertilize any aquatic plants 1 time per month through the summer months of June through August.
* GG’s shall use a water dye such as Aquashade to reduce light penetration to the bottom of the pond to help decrease algae blooms penetration to the bottom of the pond to help decrease algae blooms. (if approved)
AUTUMN MAINTENANCE:
* GG’s shall remove all fallen leaves and other debris from the pond.
* Hardy aquatic plants shall be cut back and placed at least 2′ below water level in preparation for the winter months when applicable.
* In shallow ponds, GG’s shall install a floating pond de-icer and/or a floating heater to keep the water from freezing. (If applicable)
* GG’s will remove the biofilter and submersible pump for the winter at the request of the owner/agent.
* If the filter is removed, it will be cleaned and stored indoors on site.
* If the pump is removed, it will be stored indoors on site in a container large enough to hold the pump submerged in water.
* If the pump and filter(s) are not removed at the request of the owner/agent, they must continue to run throughout the winter months.
* Maintenance of the daily water level shall be the responsibility of the owner/agent.
* The owner/agent shall remove all cold water sensitive fish to an indoor aquarium.
* The owner/agent shall feed remaining fish in the pond until the water temperature drops below 55 degrees.
* Do not feed fish more than 2-3 times per week, and do not feed fish more than they can consume in 3-5 minutes.
WINTER MAINTENANCE:
* If the pond contains fish or aquatic plants in hibernation for the winter, a good gas exchange must exist. The ice will be kept open with a pond de-icer or a floating heater previously installed by GG’s.
* The owner/agent shall report any problems with the pond de-icer or heater to GG’s immediately. (if applicable)
* GG’s will remove excess debris from the pond 1 time per month for the winter months November through March.
How to Remove Efflorescence from Your Paving Stones
You work hard to make your hardscape look just the way you want. However, you may notice that sometimes your paving stones look a bit lighter or duller than usual.

Likely, you’re looking at efflorescence. Let me explain. When you boil it down, paving stones are just small blocks of concrete. The thing is, concrete doesn’t dry quickly; it cures over time. During the curing process, calcium hydroxide (in the form of moisture) comes to the surface and combines with carbon dioxide in the air. Together, those two elements create calcium carbonate, which is also known as efflorescence.
In short, your paving stones aren’t disintegrating; they’re curing. What you see on the surface of your hardscape is simply a soluble salt and base deposit that you can easily remove. Rest assured that while efflorescence can look scary, it’s generally harmless and won’t affect the structural performance of your concrete paving stones.
It’s quite simple to remove efflorescence. However, don’t be naive; you can do severe damage if you don’t follow our instructions carefully.
How to remove efflorescence
Here’s what you’ll need:
- Garden hose
- Plastic watering can (don’t use metal)
- Muriatic Acid from Transchem, a natural acid used in swimming pools and masonry
- Boots, rubber or nitrile gloves, and protective eyewear
Then, follow these steps:
1. Thoroughly clean your patio.
First things first, when your hardscape is dry, thoroughly sweep or blow off the patio. We used a shop broom, but you can also blow it off using a leaf blower.
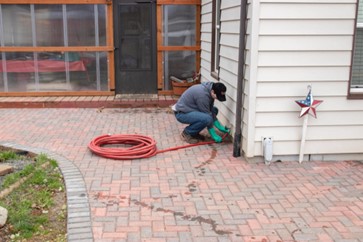
2. Get your hose ready.
Any garden hose works, as long as it reaches far enough to soak the entire surface of your paving stones. Attach your spray nozzle, unravel your hose, and turn on the water, so you’re prepared to rinse your hardscape quickly after you’ve applied the treatment solution.
3. Mix Muriatic Acid with water in a plastic watering can.
You’ll want to use, approximately, an 11:1 ratio of water to acid, or 20 ounces of acid for every two gallons of water.
We recommend filling the water can first, then add your acid. We’ve found it helpful to use a cheap, plastic graduated measuring cup to help you measure and add in the Muriatic acid. If you don’t, you’ll risk overfilling the watering can and spilling the mixture.
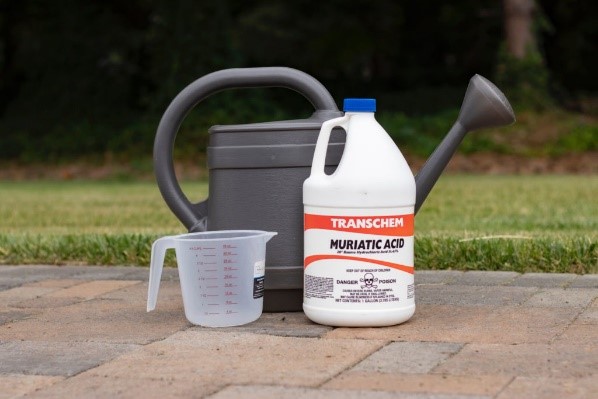
Note: When you’re working with Muriatic Acid, wear protective eyewear, a long-sleeved shirt, pants, boots, and gloves to protect your skin. Even though Muriatic Acid is natural, it’s still acid, and it will cause burns or rashes if it comes in contact with your eyes or skin.
4. Pour the Muriatic Acid mixture over a small area.
Coat a small surface area of your stones thoroughly using the acid mixture in a watering can, but do so quickly. You want the mixture to do its work but, if you leave it for too long, the acid will score the surface of the pavers.
Break your entire hardscape into small, manageable treatment areas. You want to be able to coat and rinse each area quickly so that the diluted Muriatic Acid doesn’t sit for long. It’s important to remember that while the Muriatic Acid won’t kill plants or grass, try to keep the mixture within the confines of your hardscape.
Pro Tip: Protect surfaces such as metal, concrete or asphalt from the acid to prevent unwanted damage.
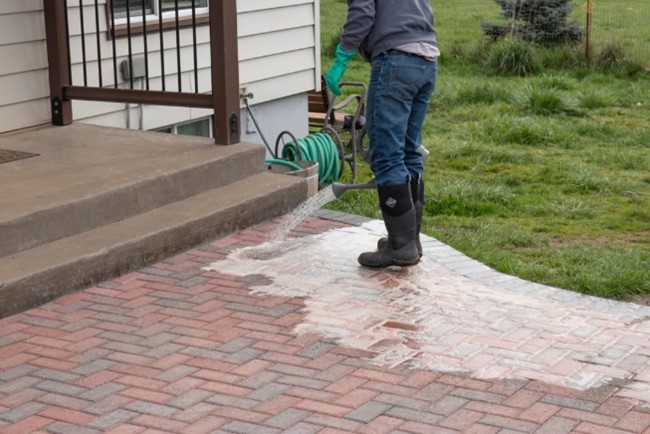
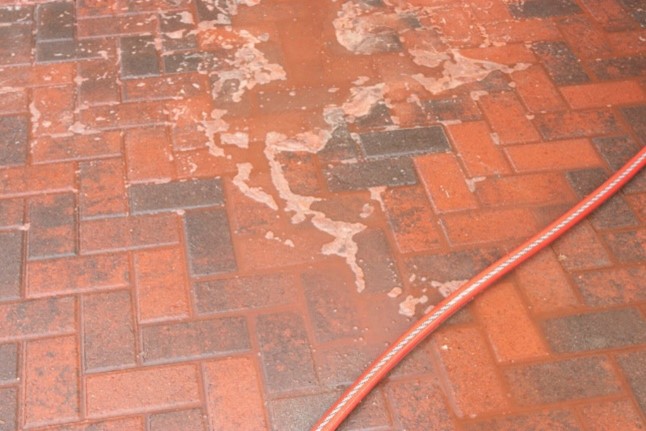
Muriatic Acid breaks down a micron thick layer of efflorescence on the surface of your paving stones, so it’s common to experience some colored standing water or foaming on your pavers. Don’t worry! It’s normal. After rinsing, your hardscape will look as good as new.
5. Wait three minutes.
It only takes three minutes for the muriatic acid to break down the salt deposits on your stones so it easily rinses off, returning your stones to their original color and vibrancy.
Smooth surface stones are especially susceptible to damage because there are no surface irregularities to hide blemishes.
Pro Tip: Don’t forget—you’ll want to rinse your stones as soon as the three minutes are up, so we recommend setting a timer on your phone. If you leave acid longer than three minutes, you risk permanently damaging your hardscape. Three minutes goes by fast, so rinse quickly after your timer ends.
6. Rinse the small area thoroughly with your garden hose.
After it’s been three minutes, you’ll want to rinse your stones immediately. Make sure to wash off all your hardscape thoroughly so that there isn’t any remaining acid residue. We recommend spraying into your grass or landscape but away from your house, garden, or any galvanized metal.

7. Repeat steps 4–6 in small sections.
Continue treating your hardscape in small areas. Wash. Rinse. Repeat. If your paving stones had heavy deposits, they may still show efflorescence and you may need to repeat the process on your entire hardscape a few times. Just follow the directions we’ve outlined in this article each time and, after a few washes, your stones will look new again.
FAQs
Does efflorescence appear on all paving stones?
Yes, efflorescence can appear on almost all paving stones after the concrete cures (and after installation). What makes efflorescence worse is if you install pavers on excessively wet sand in the winter or if you get overspray from lawn sprinklers on your hardscape.
Darker colors such as earth brown, red and charcoal will show efflorescence much more easily than lighter colors such as pewter or desert tan.
Is efflorescence normal?
Yes, even though efflorescence sometimes looks alarming, it’s normal—and it’s easy to fix.
Is there a way to prevent efflorescence?
We have a couple of tips and tricks for preventing efflorescence, but we can’t guarantee you’ll never experience efflorescence on your stones. If you have paving stones you haven’t laid yet, keep them somewhere cool and dry. Also, when you’re laying the stones, make sure all the materials you’re using (such as sand) are dry.
Does efflorescence harm my stones?
No. Efflorescence doesn’t cause long-term damage to your stones, but it can make them look dull and white. Treating your paving stones with diluted muriatic acid removes the deposits and helps them look good as new.
How long do I need to wait to let kids or pets play on the paving stones after using Muriatic Acid?
Once you’ve thoroughly rinsed the area you treated with diluted Muriatic Acid, it’s safe to play on right away. Muriatic Acid is natural and often used in swimming pools, so we’ve probably all been in contact with it at some time or another. When you pour and rinse correctly, it’s highly diluted. Just don’t eat off of the ground or let your pets lick the paving stones for a while, okay?