
What to Expect, Your New Pool

There are several phases and moving parts in the construction of an inground concrete pool, from design and material selections to boots on the ground, and each phase is built upon the previous phase’s accomplishments. In most cases, each of these phases will be preformed by a different crew or group of guys that are highly trained and skilled in their respected trades. So you can plan on having a lot of visits by different crews.
Do to COVID and the impact that it has caused on material acquisition, international manufacturing and shipping, and trade’s schedules, combined with a record high of a demand for pool constructions nationwide within the past year, phases of construction may be delayed and spaces between construction will be longer than normal. Material selections may be limited or discontinued from the supplier after the contract is signed due to the strain on their manufacturing process. We at Better View believe in transparency and are dedicated to working with you through these challenging times to make sure we continue to deliver the highest quality product we can.
For more info on how COVID delays can or are affecting your project please contact your Account Manager.
Excavators are the first trade followed by the Steel guys, then the Plumbers. The Electricians are typically next in line followed by the Gunite/ Shotcrete crew before the Tile & Coping guys. The last group of crews will be the Plaster crew followed by finally your landscape and hardscape crew.
Having these phases performed by separate trades is not a bad thing and our project manager will coordinate with all. With all of the coordination there will be gaps in visits, but it is ok, this is all part of the normal process in pool construction. You will have a lot of visits from a lot of trucks and people for a while. It will get messy for a while, so keep a stiff upper lip, and prep your significant other and neighbors. The grass will be replanted, the landscaping replaced and fence section fixed and eventually it won’t look like a war zone.
Each Phase of construction can take from 1-10 days to complete, weather permitting, and full construction can take anywhere from 3-6 months after issuance of permit. Here’s a look at each construction phase;

Pool Design Phase:
Your designer will first meet with you to review things like lot size, topography, property line, setbacks, easements, and utilities. Your budget will be important, as well as what style and shape pool you had in mind. But don’t worry, you don’t need to have it all figured out, your designer will be able to help you with photos, or you may be taken to look at some local pools we have built.
Once the shape, style and size are designed and approved, you and your designer may discuss water features, rock displays, landscaping, and hardscaping. There are options for tile and coping, plaster and advanced features like infinity edges, beach entrances, shallow water benches, tanning ledges or auto covers. For the pool deck you also have many choices to make on size, materials, texture, and accents. The possibilities for pool design can seem endless so this can begin to get a bit tiresome, but the designer will help navigate based on style and desires.
Then you have the pool equipment choices, also endless. Slide and dive equipment, cleaners, heaters, controllers, salt water or chlorine? Cartridge or DE? White or color changing lights? Your designer will help you navigate through this as well.
During material selection your designer can begin drawing up the plans and some designs for approval. After contract and design approval, your designer submits the plans to obtain the necessary city or county permits. Some HOAs might have to sign off on this too. This will start the permitting process which can take a few weeks to a couple of months for approval.
Pool Excavation Phase:

This is where the fun begins. The pool shape will be staked and painted in the yard. Fences and trees may have to be removed to allow access. Your grass will suffer where the machines traverse through the yard.
Excavators or skid steers are usually used to dig a pool, depending on the size and shape of the pool. Normally within a day they have the rough shape of the pool. The dirt is usually staged on site unless soil haul out was agreed upon.
Problems can occur if hard soils like shale or bedrock is hit, if underground springs or a high-water table begin leaking into the excavated area, or if soft soils like sand or loam are encountered. These usually don’t occur, but if they do, engineered solutions may be needed. If this does happen, there will be a discussion and a plan reviewed before proceeding.
Steel and Plumbing Phase:

After Excavation the Steel Crew can start setting the rebar reinforcement. Depending on the county the amount might very. But in all cases the steel rebar acts as a skeleton for the pool and provides the structural support for the shell of the pool. The steel is set about 2-4 inches from the dirt wall and they bend in into position to wrap around steps and curves, following the shape of the dig.
After the steel guys are done or sometimes before or during, the plumbers will set the skimmers, return lines, and drains in a process called short plumbing. The electricians may be onsite during or shortly after to connect the bonding wire to the shell of the pool and hang light niches into place. After install a steel and bonding inspection will need to be scheduled with the city or county before moving onto the next phase.
Gunite/ Shotcrete Phase:

This is when the pool starts to look like a pool. Gunite and Shotcrete is concrete that is shot out of a “gun”, pushed out with high velocity air. The material is pumped out of a hopper type truck and shot behind and on top of the steel reinforcement. Finishers with trowels then carve and sculpt it into the exact shape of the pool.
After the concrete is shot, it will need to cure before the next phase. It can take several weeks for the concrete to cure fully and can take longer during periods of inclement weather. Large rains and debris should be removed from the pool while it is curing. You may see small cracks in the rough surface, don’t panic; this is normal and will be covered and taken care of during the plastering phase.
Your back yard is sure to be torn up by now. You might still have piles of dirt, wheel ruts in your beautiful lawn, and you may have lost that cherry tree that you loved. It looks like a bomb went off! Hang in there, after a few more phases you will have your yard back again.
Plumbing Phase:
In some cases, this may happen before the Gunite phase. In the instance of a “Short Plumb” the piping will be completed now.
First the plumber will trench in the dirt around the pool leading to the designated pool equipment area. Next, they will continue to lay pipe, separating the lines for the bottom drain, the skimmers, the returns, the cleaner line and then for any water features, slides or accessories you may have. They will continue to run the lines to the pool equipment area where they may perform pressure tests. During trenching the electrician may be present again to run any conduit needed. If conduit is ran, the electrician will schedule a trenching inspection for the county before the trench can be backfilled. Next the plumber will install the pool equipment on the equipment pad.
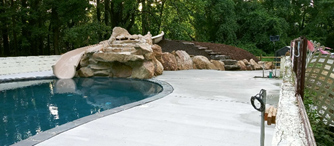
Tile and Coping Phase:

After your pool shell has gotten some time curing is the best time to place perimeter tile and coping. The perimeter pool tile allows you to maintain an easily cleanable surface at the water level. The pool coping stones provide a safety grip on the inside for easy grasping and assist in draining water away from the pool.
Electrical Phase:
The electrician installs an electrical breaker box, usually called a sub-panel, at the spot where the pool equipment (pump, filter, heater) will be set up. The sub-panel is usually a 100-amp box, and it will power the pump timeclock, pool lights, additional outside lighting, and electrical outlet. A booster pump for a pool cleaner or a salt chlorine system can also be powered from the sub-panel.
The electrician will also connect the pool lights to junction boxes installed outside of the pool deck. Then, an electrical conduit is run from the junction boxes, back to the subpanel.
The electrician should have also connected a bonding wire, which is a bare copper wire that is attached to the pool shell steel rebar. This wire connects all steel components of the pool shell and the pool equipment. It usually starts on the pool shell, connects to the ladder or slide leg sockets in the pool deck, connects to the underwater light niche, and then runs back to the equipment pad to connect to the pump, filter, and heater. Sometimes this is taken care of through the hardscape crew before they lay the pool deck. Either way after install of the bonding wire around the pool, a bonding inspection will need to be schedule with the city or county before the pool deck can be completed.
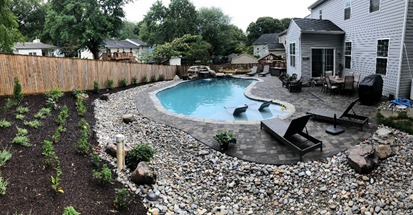
Hardscape/ Landscape Phase:
This typically can start after tile and coping is completed. Here is where a lot of the visual progress is made on the site. The crew will typically start with grading the property in preparation for pool deck installation or other hardscape projects occurring in the property. The crew will continue to lay the base of the pool deck depending on the pool deck material, whether it be a concrete pool deck, Pavers, or natural stone the base material may change. After installation of the pool deck. The crew will continue into landscaping and re beautifying the once warzone. The Hardscape/ landscaping crews are typically on site everyday (M-F barring weather or unexpected delays) working on the project at this point, so progress tends to be more visible.
Plaster Phase:

The final phase is plastering your pool’s surface and typically happens during or after the hardscape phase. Pool plaster is your waterproof layer, protecting the pool shell and steel, and gives a smooth, luminescent layer that’s easy to keep clean.
Watching a plaster crew in action is really something, they work fast, and a crew of 4-5 can have it done in 3-4 hours. They will leave the pool filling with water when they leave. It’s best to fill as fast as you can without stopping, so add extra hoses to fill faster, if you can. Or a water truck can be scheduled to arrive withing 24 hours after plastering to fill the pool, this is a lot faster but does cost. Water trucks are the preferred filling method. After water the plaster will need to be brushed at least 2 times a day for the first 3 days and at least once a day following for the first week. The more you brush the pool the smoother the plaster will be.
Pool Start Up:
Last minute cleanups or equipment installation happens during this phase. Your pool should look nearly complete at this point.
After that, your designer or project manager should schedule an orientation with you, to help you understand your pool and equipment. Film it or take notes so you can watch it a few times and have something to reference. Your pool chemistry may fluctuate and require daily checks and balances for a while, which will eventually stabilize. We highly recommend utilizing a pool service for at least the first year as this will make your life a lot easier. You’ve already been through the ringer throughout this construction process, might as well have a professional handle the chemistry and pool balancing while you and your family enjoy the new pool.